
As an Amazon Associate I earn from qualifying purchases and sometimes recommend products from other sellers at no extra cost you. For more details see my disclosure policy and privacy policy.
There’s a moment in every Factorio playthrough when the comfortable world of iron plates and green circuits gives way to something more demanding. You unlock oil processing, and suddenly you’re managing three different fluid outputs, tracking cracking ratios, and wondering why your chemical plants keep running dry. This is the game’s mid-to-late pivot — the point where your factory either scales gracefully or becomes an expensive tangle of pipes and frustration.
Intermediate production chains are the backbone of everything that follows. Plastic bars, sulfuric acid, lubricant, and modules don’t just extend your tech tree — they’re the foundation your entire megabase will eventually rest on. Getting these chains right early pays dividends for every hour you play afterward.
🛢️ Oil Processing: Understanding Your Three Outputs
Advanced oil processing is the upgrade you unlock after basic oil refining, and it’s a significant jump in complexity. Where basic processing gives you petroleum gas and heavy oil, advanced processing yields all three fractions: heavy oil, light oil, and petroleum gas — each at different rates and for different purposes.
The challenge is that your factory will almost never consume all three fractions at exactly the ratio your refineries produce them. That imbalance is what cracking is for.
Chill Place Gaming Store
Take your game further 🎮
Reference sheets, printable guides, and gaming goodies — made by the Chill Place Gaming team to help you play smarter.
Secure checkout
powered by Shopify
Cracking Ratios and Why They Matter
Cracking converts surplus fractions into more useful ones. Heavy oil cracks into light oil at a ratio of 1:0.75, and light oil cracks into petroleum gas at 1:0.666. Neither conversion is lossless, which is why you want to avoid cracking as much as possible — and instead build enough downstream consumption to use each fraction where it falls.
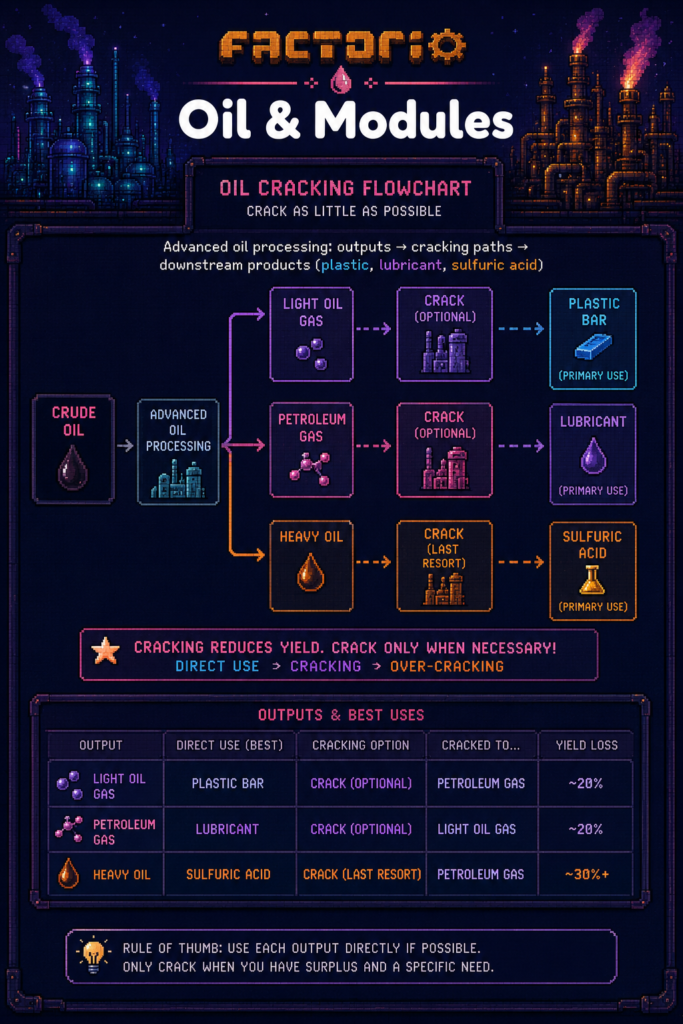
In practice, most factories run short on petroleum gas and long on heavy oil. The standard fix is to chain crack: heavy → light → petroleum gas. To do this without bottlenecks, a commonly cited ratio is roughly 20 refineries supported by 5 heavy oil cracking plants and 17 light oil cracking plants. This produces around 19.5 units of petroleum gas per second without modules, which comfortably supplies most mid-game factories.
Handling Pipe Bottlenecks
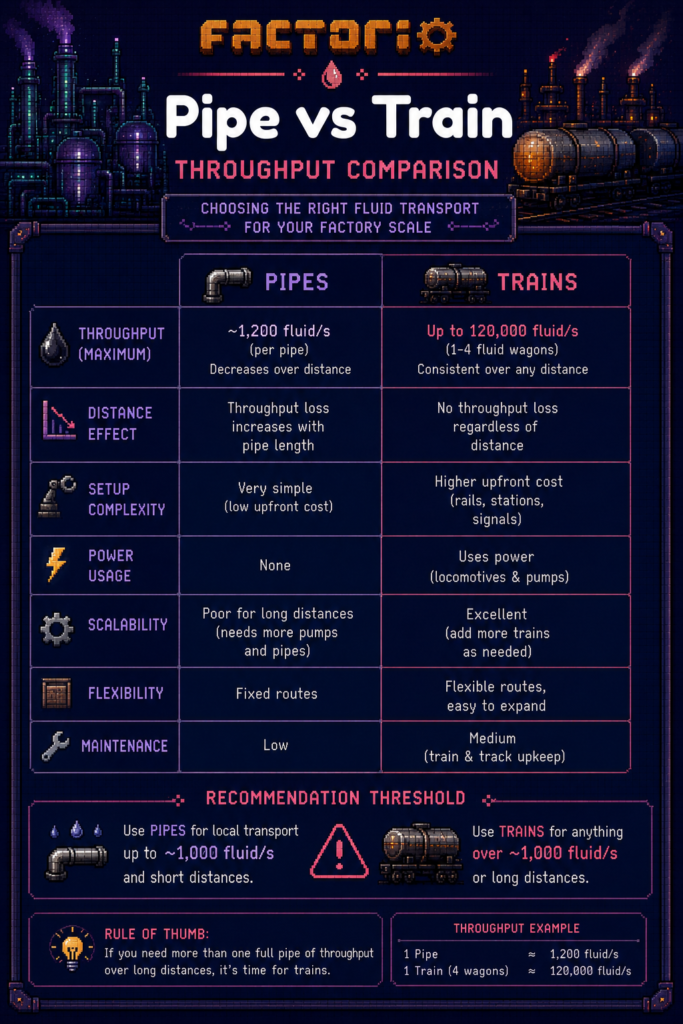
Pipes in Factorio lose throughput over distance. Long pipe runs between refineries and chemical plants will silently underperform, causing production stutters that are surprisingly hard to diagnose. The practical solution is to keep your oil processing area compact — refineries, chemical plants, and storage tanks grouped together — or to move fluids via trains for cluster setups.
If you’re running a larger factory and piping oil across the map, underground pipes reduce throughput loss, but trains are the real answer at scale. Unloading directly into fluid storage near refineries avoids the issue entirely, which is why experienced players build dedicated oil outposts connected by rail rather than stretching a pipe network across the map.
Coal Liquefaction: An Alternative for Later
Once you have coal liquefaction unlocked, you gain access to a self-sustaining heavy oil production method that doesn’t depend on crude oil at all. It requires coal and steam, making it ideal for remote outposts far from oil patches. The output is primarily heavy oil, which you then crack as needed.
Coal liquefaction isn’t more efficient than advanced oil processing, but it offers geographic flexibility. If you’ve exhausted nearby oil deposits and your logistics network is train-based anyway, a coal liquefaction outpost can cover your needs without routing crude oil across the entire map.
⚗️ Advanced Materials: Building Downstream Consumption
Advanced materials are where your oil fractions actually go. Getting these chains running smoothly is what transforms your refinery from a fluid overflow problem into a functioning production system.
Plastic Bars
Plastic bars are produced in chemical plants from petroleum gas and coal. They consume roughly 0.4 units of light oil equivalent per bar and form a critical input for advanced circuits and later-tier modules. Because they qualify as intermediates, productivity modules can be used in their production — which becomes significant at scale.
The practical challenge with plastic is that petroleum gas demand is already high by the time you’re making plastic in volume. Plan your cracking ratios with plastic production in mind, not as an afterthought. Running out of petroleum gas because you underestimated plastic demand is one of the more frustrating mid-game stalls.
Sulfuric Acid
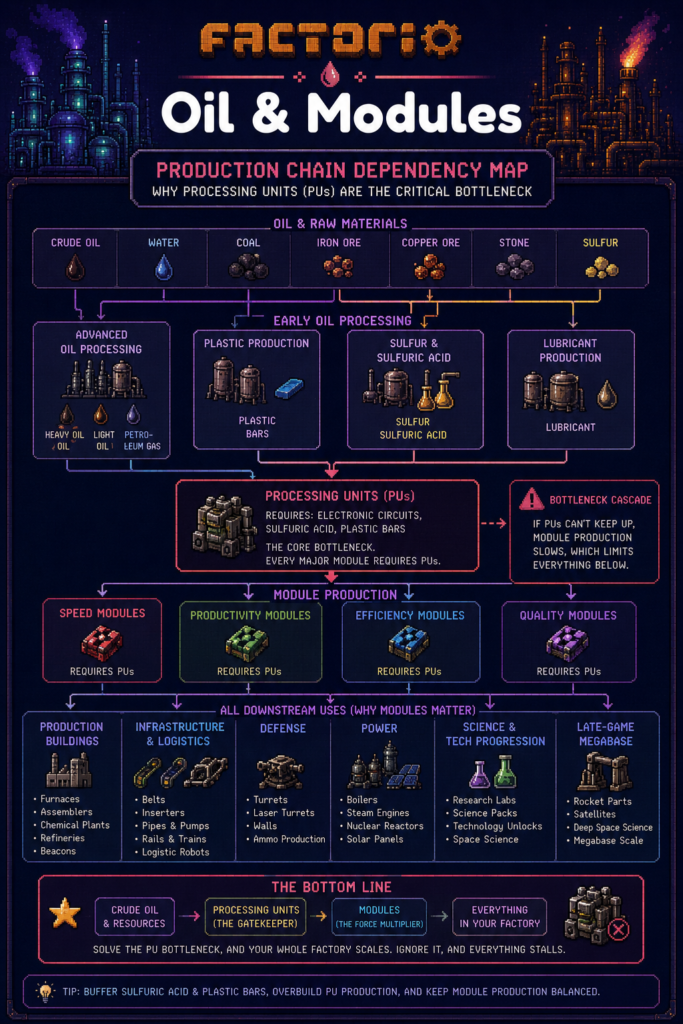
Sulfuric acid is produced from sulfur, iron plates, and water. Sulfur itself comes from petroleum gas and water in a separate chemical plant step. The main consumer of sulfuric acid is battery production and, critically, processing units — which are among the most bottlenecked items in late-game builds.
Getting sulfuric acid wrong creates a cascade. Processing units need it, processing units go into modules, modules go into everything. A sulfuric acid shortage in a module production line brings late-game research to a crawl. Set up storage tanks and buffer the supply before scaling up any module production.
Lubricant
Lubricant is made from heavy oil and is consumed by electric engines and flying robot frames. This gives heavy oil a useful direct application before cracking. If you can balance heavy oil consumption between lubricant and cracking, you reduce waste and keep the entire oil chain flowing more smoothly.
Electric engines are used in construction and logistic robots, exoskeletons, and vehicles — all things you’ll want in increasing quantities as your factory grows. Building lubricant production early and keeping it supplied means you’re never waiting on robot frames when you need to expand quickly. The connection between lubricant, robots, and efficient factory layouts is worth thinking through before your factory outgrows its logistics.
Batteries and Processing Units
Batteries are produced from iron plates, copper plates, and sulfuric acid. They’re a component in accumulators and in the circuit chain that leads to processing units. Processing units themselves require advanced circuits, circuits, and sulfuric acid — making them one of the most complex intermediates in the game.
Processing units appear in nearly every advanced recipe, including all three tiers of productivity modules. The throughput of your processing unit production line will eventually set a ceiling on how fast you can research and build. Treat it as a priority chain, keep it fully supplied, and add productivity modules to it as soon as you can — those are among the highest-leverage placements in the game.
🔧 Modules: When and Where to Use Them
Modules are one of the more nuanced systems in Factorio because their value depends entirely on placement. A productivity module in the wrong building wastes materials; in the right one, it can increase output by 30–80% effectively for free.
How Productivity Modules Work
Productivity modules (tiers 1 through 3) add a productivity bonus to qualifying recipes — typically intermediates like oil cracking, plastic bars, circuits, and modules themselves. Tier 1 adds 4% output for free, tier 2 adds 6%, and tier 3 adds 10%. The trade-off is reduced speed (5–10% per module) and increased energy consumption and pollution.
The key restriction is that productivity modules only work on intermediate recipes. You can’t put them in mining drills or electric furnaces without using the special productivity research versions. But you can place them in assemblers producing advanced circuits, chemical plants processing oil, and other intermediate steps — which is exactly where you want them.
Priority Placements
The best productivity module placements share two characteristics: the recipe has a long chain of expensive inputs, and the output feeds into many other recipes. Oil refineries and chemical plants are the highest-priority targets because every free unit of petroleum gas, plastic, or sulfuric acid ripples forward through dozens of downstream recipes.
Assemblers producing advanced circuits and processing units are the next tier. These items are both expensive to make and consumed by almost everything. Every extra processing unit generated by a productivity module means slightly less mining, smelting, and circuit production needed upstream — that saving compounds across your entire factory.
Module production lines — the ones actually making the modules — are themselves qualifying recipes. Putting productivity 3 modules into the assemblers that make productivity 3 modules creates a small recursive gain. At megabase scale, this matters.
Speed Modules and Beacons
Productivity modules slow things down, which is why beacon-based designs pair speed modules in beacons with productivity modules in machines. Beacons radiate a speed bonus to all buildings within range, which more than compensates for the speed penalty without consuming more of the productive building’s module slots.
The standard setup is to surround key production buildings — especially processing unit assemblers and advanced circuit lines — with beacons carrying speed modules. The buildings themselves run productivity modules. This combination maximizes output per building slot and is the standard approach in any late-game or megabase design.
For pumpjacks and electric miners, efficiency modules are often better than productivity ones because they reduce pollution, which directly reduces biter aggression. Early-game factories where defense is still a concern benefit from this approach, as discussed in depth in our guide to managing Factorio’s train and logistics networks.
Efficiency Modules: The Defense Angle
Efficiency modules reduce power consumption and pollution output. They don’t increase production, but in factories where pollution triggers frequent biter attacks, reducing it strategically can reduce the defensive investment needed to keep the factory safe.
Pumpjacks are the highest-pollution-per-building source in most mid-game factories. Fitting them with efficiency modules cuts pollution output dramatically. If you’re playing with biters enabled and finding that waves are scaling faster than your defenses can handle, check what’s generating the most pollution — pumpjacks with efficiency modules are usually the most cost-effective fix.
🎮 Putting the Chain Together
The through-line across oil, advanced materials, and modules is the same principle that runs through all of Factorio: think about the chain, not just the recipe. A refinery that overflows heavy oil isn’t a refinery problem — it’s a lubricant and cracking consumption problem. A module production line that runs slowly isn’t a module assembler problem — it’s a processing unit supply problem.
Getting these intermediate chains right is what separates a factory that scales from one that requires constant firefighting. If you’re earlier in your Factorio journey and still working out the core build order and factory structure, the Factorio review and system overview covers how the production phases connect from early game through late game — useful context before tackling the complexity of oil processing in earnest.
Once these chains are running smoothly and you’re producing modules at scale, the next major system worth mastering is blueprint design and layout strategy — where all that automated production starts paying off in faster factory expansion.
🗺️ Continue Your Journey
Factorio Factory Layouts and Expansion Strategies — How to organize your factory so oil and module production scales without turning into spaghetti.
Mastering Trains in Factorio — The logistics layer that makes large-scale oil and materials distribution possible.
Factorio Blueprints: Speed vs Learning — When to use community blueprints for module and circuit production versus building your own.
Want weekly Factorio tips and strategy game news? Join our newsletter — new guides every week covering the games that are worth your time.
Get more strategy tips every week
Join readers who get our weekly roundup covering Cities: Skylines II, Factorio, Civ VII, and more.


