
As an Amazon Associate I earn from qualifying purchases and sometimes recommend products from other sellers at no extra cost you. For more details see my disclosure policy and privacy policy.
Your first rocket launched, belts run clean, bots keep up, and the biters have mostly stopped bothering you. Now you’re staring at the map thinking about a base ten times this size, and the honest answer is that scaling up isn’t just more of the same. It’s a different set of problems entirely, and this guide is the roadmap for making that jump without rebuilding your whole factory twice.
🏭 What Actually Counts as a Megabase
Ask ten veteran players what makes a megabase and you’ll get ten different numbers. The community has settled loosely around 1,000 science packs per minute (SPM) as the point where a base stops being “big” and starts being a megabase, a figure that roughly lines up with the older benchmark of launching a rocket every minute.
Space Age complicates the number games a little, since infinite research now pulls from multiple planets with different pack costs. SPM isn’t the only unit people track either: some watch rockets per minute (RPM), especially now that rockets feed space platforms as much as the tech tree, while others focus on raw plate or ore throughput for whatever resource is currently their limiting factor. Whichever number you pick, treat it as a rough waypoint rather than a target to hit exactly, and measure it across several full research cycles rather than a single lucky burst.
The number matters less than the shift in thinking behind it. Optimising a factory means fixing your current bottleneck: a starved assembler, a jammed inserter, a shortage of green circuits. Designing a system of factories means building so that when something breaks or needs more capacity, you already know exactly what to duplicate.
Chill Place Gaming Store
Take your game further 🎮
Reference sheets, printable guides, and gaming goodies — made by the Chill Place Gaming team to help you play smarter.
Secure checkout
powered by Shopify
That’s the real dividing line for this guide. If you’re still tuning ratios on a single production line, our science pack optimisation and tech tree progression guide covers that ground already. This piece assumes those ratios are solved and asks a different question: what happens when you need fifty copies of that line instead of one?
A useful mental test is to picture your factory doubling overnight. If doubling means “copy this block forty more times and connect it the same way,” you’re already thinking like a megabase builder. If doubling means “redesign half the base because nothing here scales cleanly,” that’s the gap this guide is meant to close, one decision at a time.
🚂 Choosing Your Backbone at Scale
Every megabase needs a backbone, the system that moves bulk materials between production areas once a single main bus can’t carry the volume anymore. Our factory layouts and expansion strategies guide walks through the spaghetti-to-city-blocks progression in detail, so this section won’t repeat it. What matters here is picking the backbone that matches your goals and your map, not the one that looks best in someone else’s screenshot.
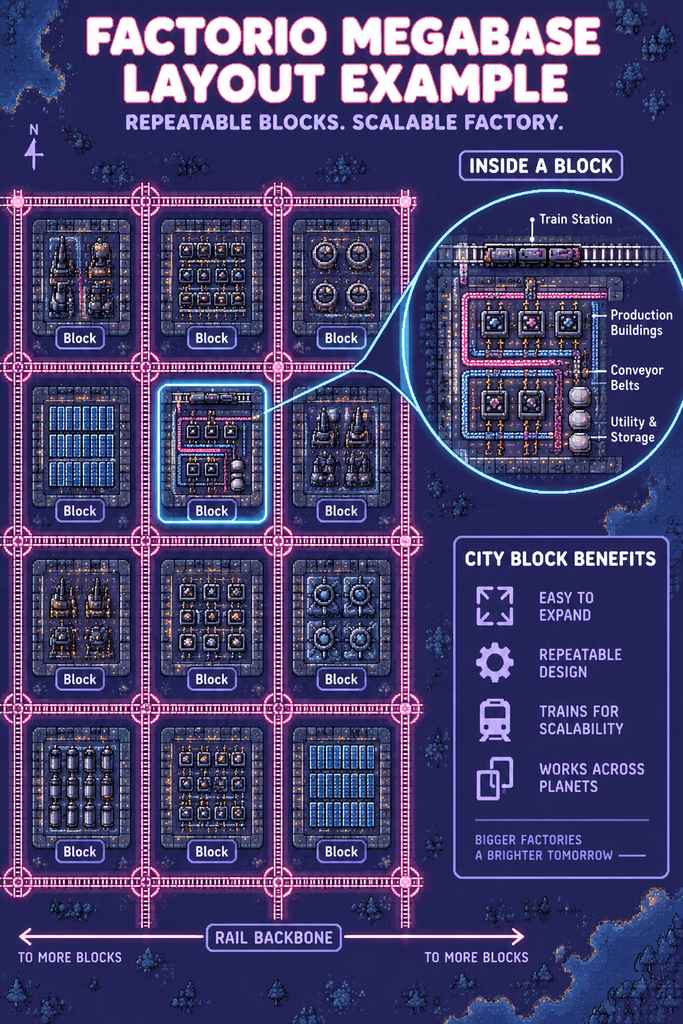
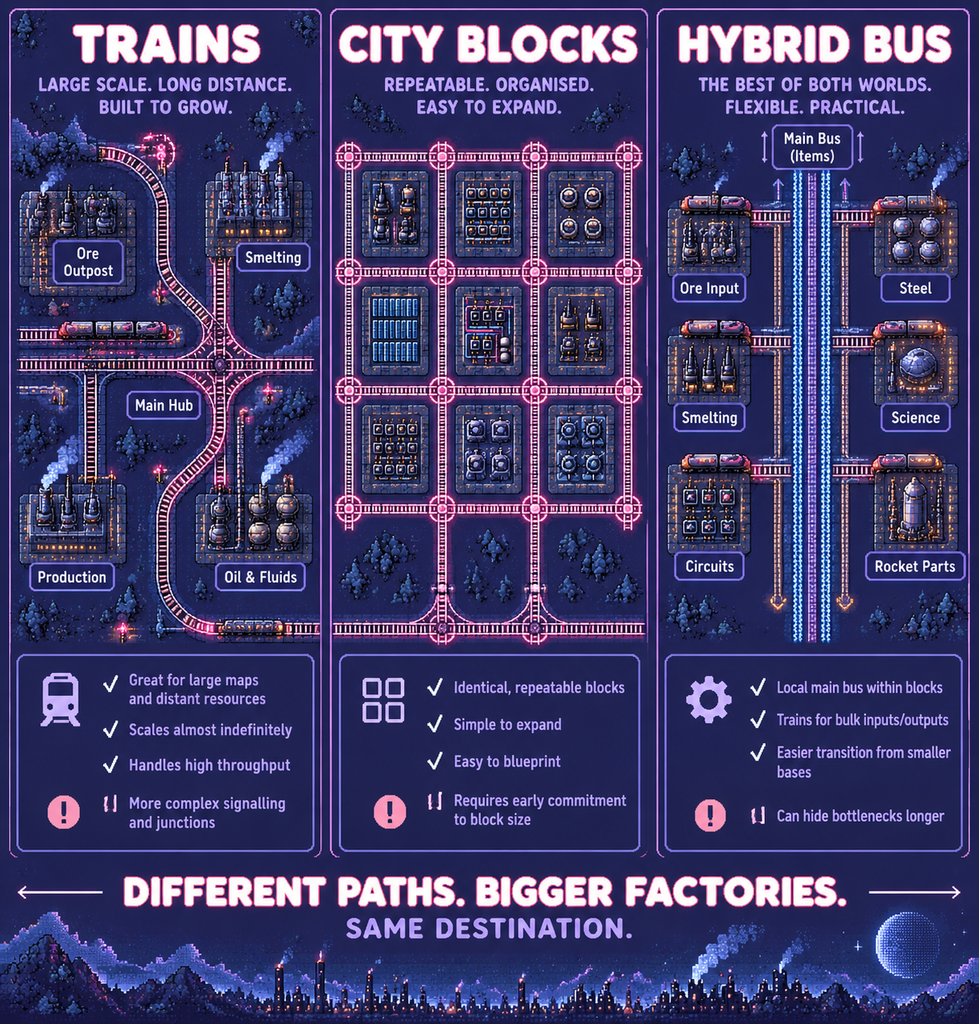
A train-based backbone suits bases spread across a large map, multiple distant ore patches, or a Space Age save juggling several planets. It scales almost indefinitely once your signalling and station design are solid, but it front-loads complexity into junctions, train limits, and stacker capacity. Our guide to mastering trains in Factorio covers those rail fundamentals if you need to shore them up before leaning on this approach.
A city-block layout is really a train backbone with strict rules attached. Every block is the same size, every block connects the same way, and expansion becomes a matter of stamping down another block rather than redesigning anything. It’s the easiest system to blueprint and hand off to a repeatable workflow, but it demands an early commitment to block size, since resizing later usually means ripping up track. If you want the fuller city-builder framing behind that decision, our factory district zoning guide covers it end to end.
A hybrid approach keeps a short main bus inside each production cell for local item flow, then uses trains only for bulk inputs and outputs between cells. It’s the most forgiving option if you’re transitioning gradually, since you’re not tearing out a bus you already trust. The trade-off is that hybrids can hide a bottleneck longer, because the internal bus quietly absorbs problems a stricter city-block layout would expose immediately.
Use these criteria rather than personal preference alone to decide:
- Trains: your map is spread out, ore patches are far apart, or you’re running a multi-planet Space Age save.
- City blocks: you want maximum repeatability and can commit to a block size and train length before track goes down.
- Hybrid main bus: you’re not ready to abandon a bus you trust but need more throughput than it can carry alone.
⚡ Power and Pollution: Plan Before You Scale, Not After
Power and pollution are the two things megabase builders most often bolt on after the fact, and both punish that habit. Pollution spreads from every polluting building as an expanding cloud, and the game’s evolution factor rises based on how much pollution your factory produces, not how well you contain or filter it. Building bigger without a pollution plan just moves the deadline on a much bigger biter problem, it doesn’t remove it.
If biter pressure at scale is new territory for you, our guide to biter defence, walls, and turret placement covers that properly. The point here is timing: decide your pollution and defence posture before you multiply your production, not after the alarms start going off.
Power scaling has a similar planning problem. Solar is clean and simple to reason about, but it eats an enormous amount of space at megabase scale, since panels and accumulators multiply directly with demand. Nuclear power packs far more output into a much smaller footprint, which is why most dedicated megabases lean nuclear once demand climbs past what a modest solar field can cover.
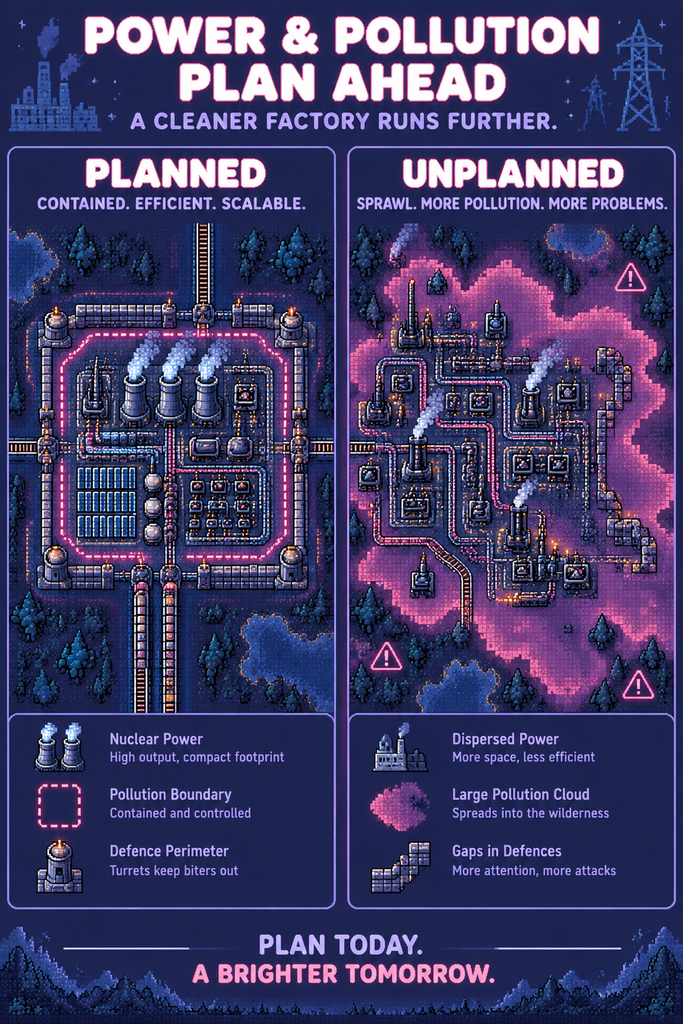
Nuclear isn’t free of trade-offs either. It adds its own logistics chain for fuel cells and waste, and at the truly enormous end of the scale, simulating a large reactor farm and its heat pipe network can start costing you simulation speed before it costs you anything else. Whichever source you pick, size it for where your next expansion phase is heading, not just for your current draw.
The practical takeaway is to size power and defence for the phase after the one you’re currently building. If you’re about to double production, sketch out the power draw and pollution radius for that doubled state now, while it’s still a diagram and not a base you’re retrofitting under pressure.
🧩 Blueprint Philosophy: Building in Repeatable Modules
Megabases aren’t built brick by brick, they’re built by stamping the same solved problem down repeatedly. That means every production cell, whether it’s a smelting array, a science pack line, or a beacon-and-module setup, should exist as a blueprint you trust completely before you place a second copy.
Our piece on the speed versus learning trade-off with blueprints digs into when copying a blueprint helps you and when it quietly stops you from understanding your own base. That trade-off matters even more at megabase scale, where a flawed blueprint doesn’t cost you one bad line, it costs you fifty identical ones.
Design each module to be as self-contained as possible: its own power tap, its own logistics connection, its own buffer. A module that depends on some assumption about whatever gets built next to it will break the moment your layout doesn’t match that assumption, and at megabase scale that mismatch eventually happens.
Leave room in every module for the version you’ll want fifty hours from now, not just the one you need today. Ripping up a working block to widen it later is far more expensive than over-provisioning a bit of space you don’t use yet.
🚧 Common Late-Game Bottlenecks and How to Plan Around Them
Every megabase hits the same handful of walls, usually in the same order. The first is ratio breakdown: ratios that worked perfectly at a modest SPM quietly stop holding at a much higher one, because rounding, module effects, and beacon overlap all behave differently once throughput climbs. Recheck your ratios at the scale you’re actually running, not the scale you originally designed them for.
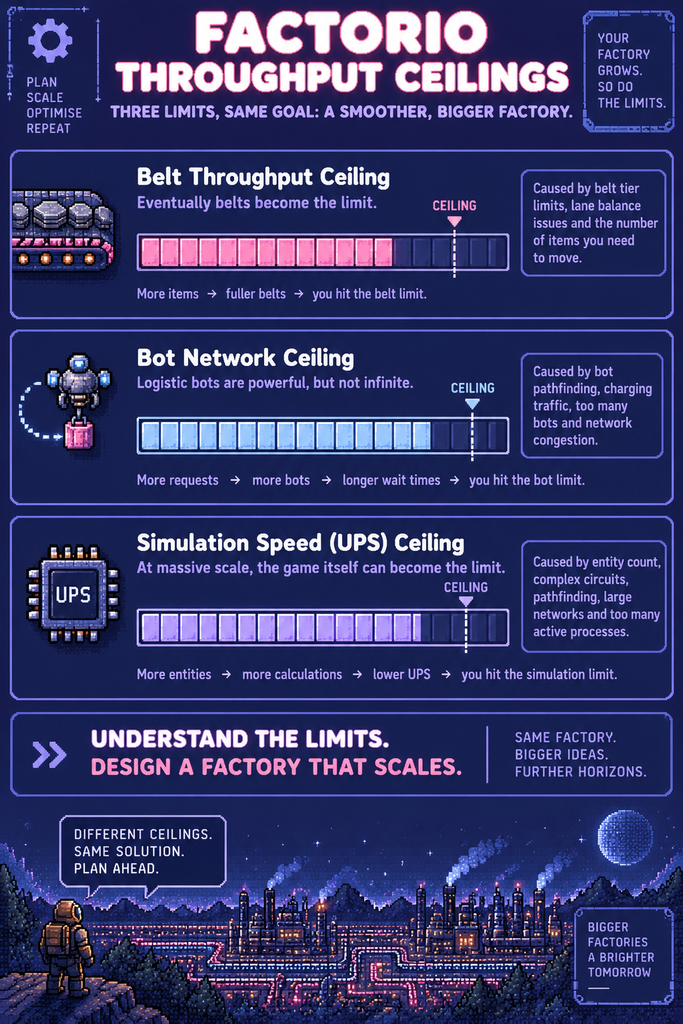
The second wall is belt throughput. Any given belt tier has a hard cap on items per minute, and once your bus lanes hit that cap, adding more assemblers downstream does nothing until you add belt capacity or split the load across parallel lanes.
Bots have a similar ceiling, just measured differently. It isn’t the belt that caps you, it’s the number of bots relative to travel distance and cargo demand, and congestion plus charging time both scale with the size of the network. Our logistics robots and network guide covers the sizing and charging considerations that matter once you’re leaning on bots this heavily.
The third wall is simulation speed itself, generally shortened to UPS. A base can sit comfortably under its production cap and still slow down, because there’s simply too much for the game to simulate every tick, and that’s a different problem with different fixes than a throughput bottleneck. Build checkpoints into your expansion plan, not just SPM milestones, where you stop and measure actual simulation speed, actual belt saturation, and actual bot wait times before committing to the next block.
Space Age adds a fourth thing worth watching: quality modules and their associated production chains change the maths on ratios you may have relied on for years. A line built around a mix of normal and higher-quality outputs doesn’t behave like a line built around uniform items, so treat any ratio you copied from an older base as a starting point to verify, not a fact to trust blindly.
🔗 When to Unify Circuits, Bots, and Trains Into One System
At a certain point, the individual systems you’ve built stop being separate decisions and start needing to talk to each other. That’s usually the real sign you’re into megabase territory rather than just running a big base.
Circuit networks are the connective tissue that makes this possible. A circuit-controlled train station can hold a delivery until a buffer runs low, a circuit-gated bot request can throttle itself when a resource turns scarce, and a circuit-read belt sensor can shut down an overproducing line on its own. Our circuit networks advanced automation guide is the natural next stop once you’re ready to wire your backbone, your bot network, and your production cells into one responsive system instead of three you’re manually babysitting.
You don’t need this level of integration on day one of scaling, and forcing it too early just adds complexity you have no use for yet. The signal to invest in it is specific: you’re spending more time manually reacting to shortages and overflows than you are actually expanding.
Start small when you do unify these systems. Wire up one buffer-to-train signal, confirm it behaves the way you expect over a few in-game hours, then extend the same pattern to the next block rather than rewiring the whole base in one sitting.
If refreshing the basics of belts, inserters, and assemblers would help before any of this clicks into place, our automation basics guide is the right starting point. Everything in this guide assumes those fundamentals are already second nature.
Bringing It All Together
Scaling to a megabase isn’t one big decision, it’s a series of smaller ones made in the right order. Define your benchmark, choose a backbone that matches your map and goals, plan power and pollution ahead of demand, build in repeatable modules, and watch for the ratio, belt, and bot ceilings before they catch you off guard.
None of these choices are permanent. Plenty of successful megabases started on a main bus, migrated to city blocks one section at a time, and only unified circuits and trains once the manual babysitting got tiresome.
Treat this guide as the map, not the route. The route is whatever order these decisions make sense for the factory you’re actually building today.
Continue Your Journey
Ready to go deeper on any one piece of the puzzle? Check out our guide to mastering trains in Factorio for backbone fundamentals, our factory district zoning guide for a city-builder take on organising space, and our circuit networks advanced automation guide for tying your systems together once you’re ready.


