
As an Amazon Associate I earn from qualifying purchases and sometimes recommend products from other sellers at no extra cost you. For more details see my disclosure policy and privacy policy.
Your city looks fine on the overview map, right up until rush hour hits and half your junctions turn orange at once. You’ve already fixed the obvious road hierarchy mistakes, so this isn’t that problem anymore. This is the next layer: junction geometry, district-level flow, and service access working against each other in ways that only show up once your city is big enough to actually stress-test them.
🎯 Design Prevention Into Your Roads, Not Just Fixes
If you’ve already got a handle on basic road hierarchy, you’ve probably noticed your traffic problems didn’t disappear, they just moved. Junctions choke at district borders, service vehicles queue behind commuters, and one bottleneck three blocks away quietly ruins flow across half the map.
This isn’t about fixing jams after they’ve already formed. That’s what our advanced traffic management guide covers. This is about treating junction geometry, district-level zoning, and service access as one integrated layout problem you solve before you lay a single road, so the jams never get the chance to start.
🚦 Choosing the Right Junction for the Job
Cities: Skylines II’s traffic AI is genuinely trying to help you. Agents actively look for better lanes, will cut into gaps at the last second, and follow real give-way rules at roundabouts, entering vehicles yield to traffic already circulating. That AI behaviour rewards junction choices that give it clean options, and punishes junctions that force awkward decisions.
Chill Place Gaming Store
Take your game further 🎮
Reference sheets, printable guides, and gaming goodies — made by the Chill Place Gaming team to help you play smarter.
Secure checkout
powered by Shopify
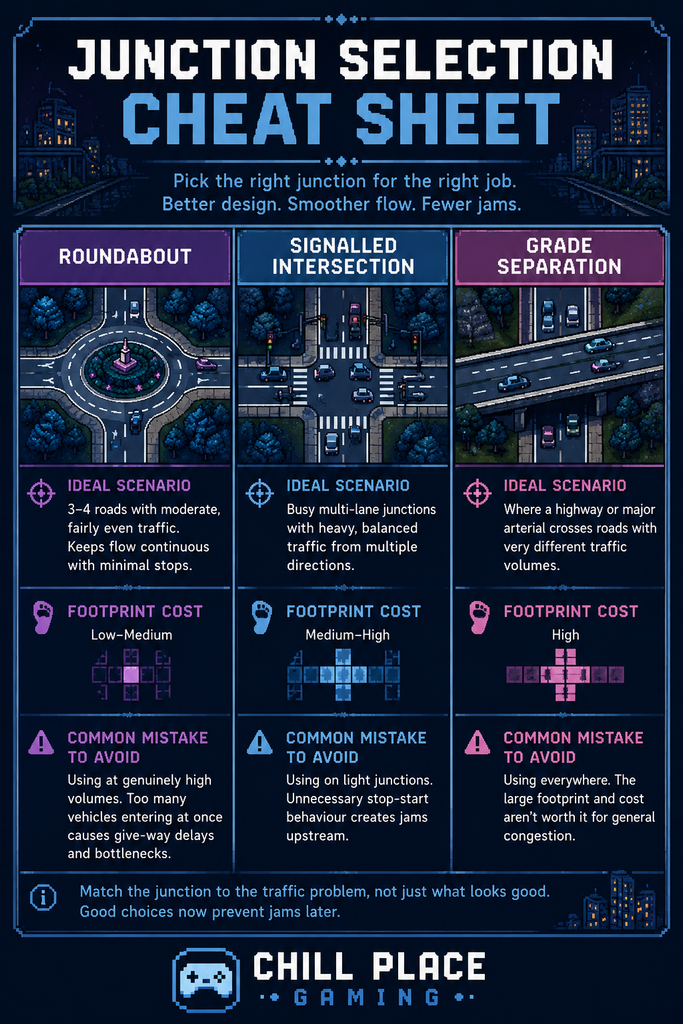
Roundabouts are your best tool for junctions with three or four roads carrying moderate, fairly even traffic. They keep flow continuous without a hard stop, and the AI handles merging into them reasonably gracefully. Where roundabouts fall down is at genuinely high-volume junctions, since the constant give-way behaviour becomes a bottleneck once too many vehicles are trying to enter at once.
Signalled intersections earn their footprint at busy multi-lane junctions where conflicting flows from several directions genuinely need strict timing to avoid deadlock. Reserve traffic lights for junctions where volume from multiple directions is roughly balanced and heavy. Overusing signals on light junctions just adds unnecessary stop-start behaviour that ripples backward into upstream traffic.
Grade separation (over/underpasses) is worth the footprint cost specifically at points where a highway or major arterial crosses a road carrying meaningfully different traffic, since it removes the conflict entirely rather than managing it. Think of grade separation as the tool for volume mismatches, not general congestion.
📊 Reading Simulation Data Before It Becomes a Problem
Cities: Skylines II gives you two tools most builders under-use: path visualisation and the congestion overlay. Path visualisation lets you click a building and see the actual route vehicles are taking to reach it, which is often not the route you assumed when you designed the road network.
The congestion overlay colours road segments by how backed up they are, and the habit worth building is checking it regularly during normal play, not just when you notice a jam. A segment showing early orange, even briefly during rush hour, is telling you a junction nearby is close to its capacity ceiling well before it becomes a visible problem.
Cross-reference the two: if the congestion overlay shows a segment struggling and path visualisation shows several unrelated buildings all funnelling through that same junction, you’ve found a design flaw, not a temporary spike. That’s the difference between a junction that needs redesigning and normal traffic noise that will resolve itself.
🏙️ Matching Road Capacity to District Density
A junction can be geometrically perfect and still choke if the roads feeding it don’t match the density of the district behind them. This is the mistake that shows up most in intermediate cities: a dense residential or commercial district zoned aggressively, still connected to the network through the same two-lane road that served it when it was low-density.
Before you zone a district for higher density, work backward from the roads first. A high-density commercial core needs arterial-grade roads reaching it, not just at its edges but at multiple entry points, so traffic isn’t forced through one overloaded funnel. Our guide on supply chains in Cities: Skylines II covers a similar principle for goods movement, and the same logic applies to commuter traffic: capacity has to be planned ahead of demand, not patched in after the fact.
Districts that share a border are the other place this bites builders. If two adjacent districts both drain onto the same connector road, that road needs to carry the combined load of both, not just look adequately sized for either one individually.
🚑 Give Service Vehicles Their Own Lanes
Emergency vehicles, garbage trucks, and transit all default to using the same roads as everyday commuters unless you deliberately design around it, and that’s the single most common reason a city with decent traffic still has slow emergency response times or missed garbage pickups.
The fix isn’t complicated once you know to look for it: route dedicated service and transit access along secondary streets that parallel your main arterials, rather than making every service vehicle merge into the same commuter-heavy junctions everyone else uses. Where your budget and space allow it, a dedicated bus lane or a service road running behind a commercial strip pays for itself quickly in response times and reliability.
This matters even more at scale. Once a district’s population climbs and coverage areas expand, as our guide on city services and coverage in Cities: Skylines II explains, response time depends as much on road access as it does on facility placement. A well-placed fire station stuck behind the same jammed junction as morning commuters is still a slow fire station.
🛣️ The Highway-to-Local Transition, Where Advanced Builders Still Get It Wrong
Even experienced players tend to under-design the transition zone where a highway or major arterial drops down into local streets. Traffic moving at highway speed hitting a tight local grid without a proper deceleration and merge zone is one of the most reliable ways to generate a standing jam, regardless of how well the rest of your network is built.
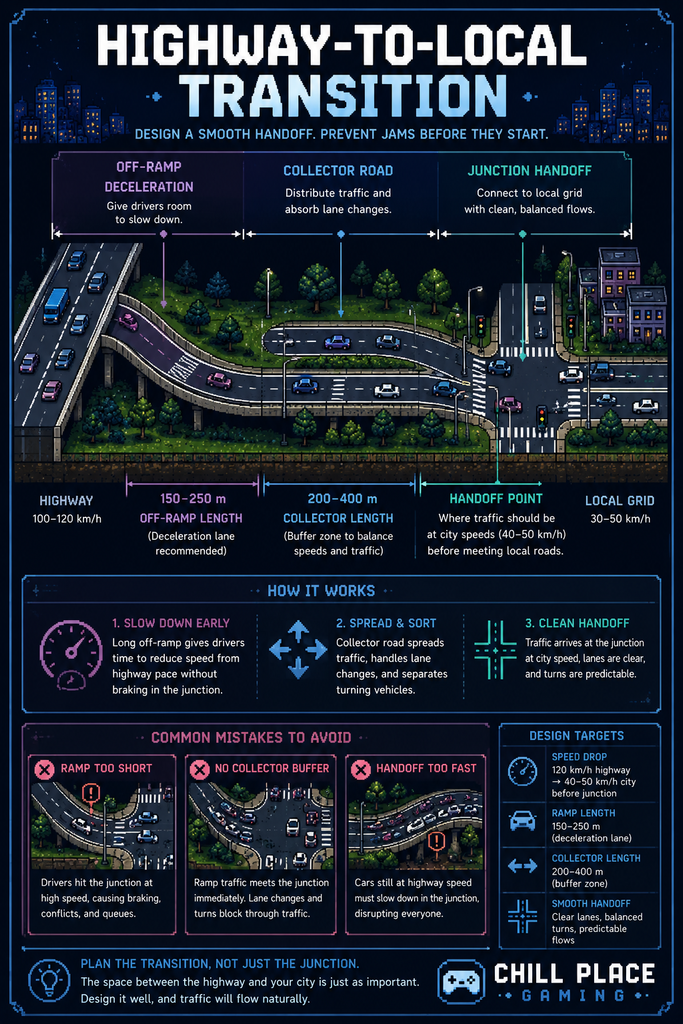
Give that transition real space: an off-ramp with enough length to slow safely, a collector road that gathers traffic before it disperses into the local grid, and ideally a roundabout or signalled junction right at the handoff point rather than a straight T-junction. Skipping this step is invisible on a map at a glance and completely obvious the first time your city hits real rush-hour volume.
🔧 Worked Example: Redesigning a Choked District Junction
Picture a four-way junction sitting at the border between a dense commercial district and a growing residential district, both feeding onto it from two directions, with a bus route also passing through. The congestion overlay shows it running orange most of the day and red during evening rush.
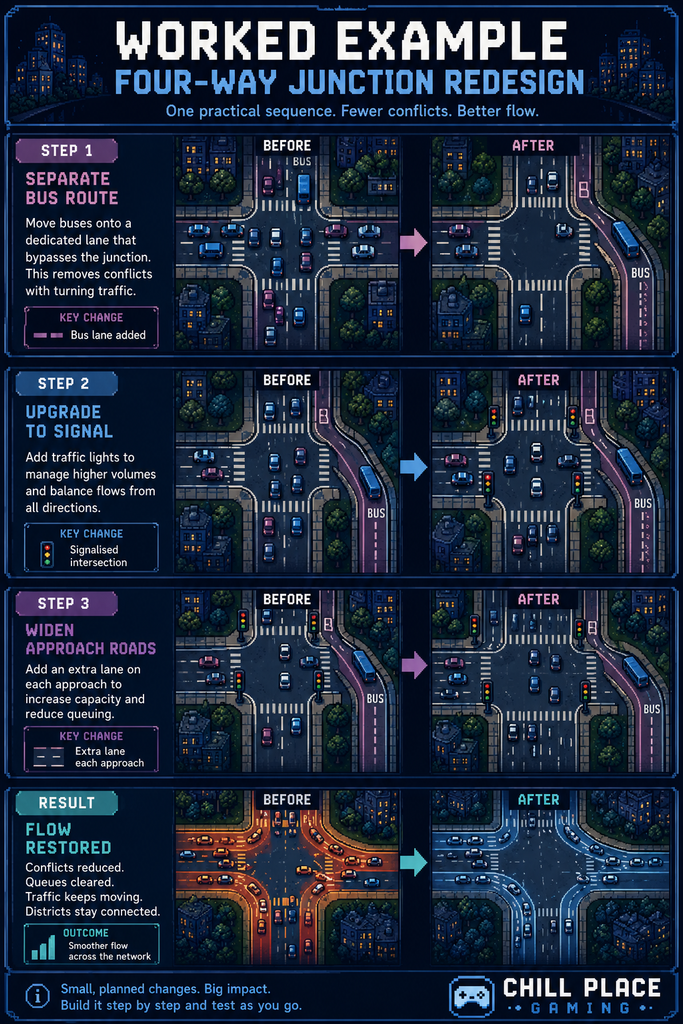
Start by checking path visualisation to confirm what’s actually converging there. In this case, commercial-bound commuter traffic, residential outbound traffic, and the bus route are all sharing the same two lanes in each direction. Step one is separating the bus route onto its own lane or a nearby parallel street, since transit vehicles stopping to pick up passengers are a major source of the backup.
Step two is upgrading the junction itself. Given four directions with genuinely heavy, roughly balanced volume, this is a textbook case for a signalled intersection rather than a roundabout, since roundabout give-way behaviour would struggle at this volume. Step three is widening the two heaviest approach roads from two lanes to three where the width budget allows, giving vehicles more room to queue without backing traffic up into the previous junction.
The result: the bus stops interrupting commuter flow, the signal handles the genuinely heavy four-way volume better than a roundabout would have, and the wider approaches give the junction breathing room before the next rush hour hits. None of these three changes fixes the problem alone. Together, they solve it.
🧭 The Short Version
Prevention beats repair every time in Cities: Skylines II. Choose junction types based on actual volume and direction balance rather than habit, check the congestion overlay and path visualisation before problems become visible, match road capacity to district density ahead of zoning decisions, give service and transit vehicles their own routes, and give highway-to-local transitions real space to breathe.
Get those five things right at the planning stage, and most of the reactive traffic firefighting most builders spend hours on simply never needs to happen.
Get more strategy tips every week
Join readers who get our weekly roundup covering Cities: Skylines II, Factorio, Civ VII, and more.


