
As an Amazon Associate I earn from qualifying purchases and sometimes recommend products from other sellers at no extra cost you. For more details see my disclosure policy and privacy policy.
Factorio is fundamentally a game about bottlenecks. Every slowdown, every idle machine, every flickering power lamp is a puzzle waiting to be solved — and once you learn to read the symptoms, the solutions follow naturally. Whether you’re a few hours into your first playthrough or rebuilding your third spaghetti base, the same core problems tend to show up time and again. This guide walks through the most common factory failures, what causes them, and exactly how to fix them.
🎯 Belt Starvation: Why Only the First Machines Run
You’ve set up a clean row of assemblers, but the machines at the far end keep flashing the “no materials” icon while the ones near the input chug along just fine. This is belt starvation, and it’s one of the first headaches new Factorio players encounter.
The root cause is usually one of two things: either the upstream production isn’t generating enough of the ingredient to fill the belt, or you’ve connected more assemblers to a belt than its throughput tier can support. A single yellow belt carries 15 items per second — which sounds like plenty until you have a row of eight assemblers all pulling from it.
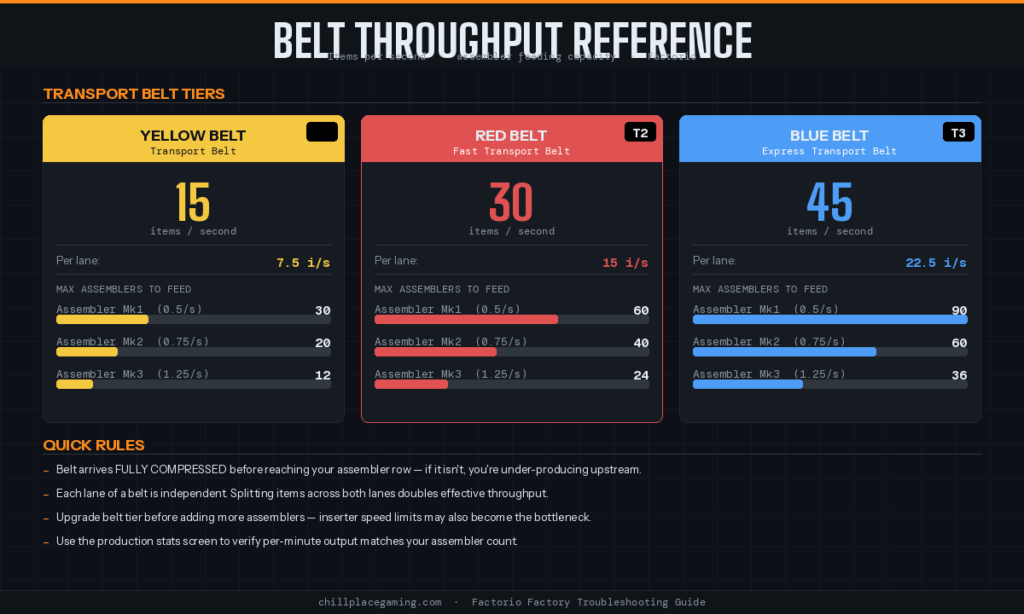
The fix starts upstream. Count how many assemblers your belt can realistically feed, then scale up your mining, smelting, or intermediate production until the belt arrives at your build fully compressed. If you’re producing green circuits, for example, and only the first few assemblers are running, the culprit is almost always not enough copper cable assemblers feeding into them. Doubling copper cable production is often the immediate solution. For growing factories, upgrading to red or blue belts is the longer-term answer.
Chill Place Gaming Store
Take your game further 🎮
Reference sheets, printable guides, and gaming goodies — made by the Chill Place Gaming team to help you play smarter.
Secure checkout
powered by Shopify
⚡ Full Belts, Idle Assemblers: The Inserter Bottleneck
This one catches experienced players off guard. The belt is packed solid with items, the assemblers have power, so why are they crawling along or sitting idle? When belts are full but machines aren’t running at capacity, the inserters are almost always to blame.
Standard inserters have a fixed grab cycle. If you’ve added speed modules or beacon effects to your assemblers, those machines can now consume items faster than a basic inserter can supply them. The inserter becomes the new bottleneck, regardless of how well-stocked the belt is. Inserter placement matters too — an inserter grabbing from a belt corner or using a long-handed reach path runs noticeably slower than one pulling in a straight line.
⚙️ Inserter Type Comparison
| Inserter Type | Speed Tier | Items/s (base) | Stack Size | Best Used For | Upgrade Path |
|---|---|---|---|---|---|
| Burner Inserter | Slow | 0.6 / s | 1 | Early game only Coal supply | Replace as soon as power is available |
| Inserter | Slow | 0.83 / s | 1 | Low-throughput builds Chest loading | Upgrade to Fast for any production line |
| Long Handed Inserter | Slow | 1.2 / s | 1 | Skip-a-tile reaches Train wagon loading | Use sparingly; straight-line inserters are faster |
| Fast Inserter | Medium | 2.31 / s | 1 | General production Science packs Circuit networks | Go to Stack Inserter for high-speed lines |
| Filter Inserter | Medium | 2.31 / s | 1 | Sorting mixed belts Output filtering | Use with circuit conditions for smart sorting Requires Red Science research |
| Stack Inserter | High | up to 13.8 / s | 1 → 12 (research) | Train loading/unloading Beaconed assemblers High-speed belts | Max via Inserter Stack Size research (x6 max) End-game workhorse inserter |
| Stack Filter Inserter | High | up to 13.8 / s | 1 → 12 (research) | Mixed wagon unloading High-speed sorting | Best for smart train station sorting Most expensive inserter |
The fix is to upgrade to faster inserters or add stack inserter research to your tech queue, then switch to stack inserters in high-throughput areas. Moving assemblers and belts so inserters can grab in a clean straight line also helps significantly. For very fast production lines, adding a small intermediate buffer chest between the belt and the inserter gives the inserter something it can drain quickly rather than waiting on individual items.
🔋 Power Shortages: Reading the Graph
Everything slows down. Lamps flicker. The production graph shows big dips. You’re dealing with a power shortage — and the good news is Factorio gives you exactly the tools to diagnose it quickly.
Open the power graph and look at the “satisfaction” line relative to “demand.” When satisfaction drops below 100%, your generators can’t keep up with your factory’s appetite. The most common causes are a steam setup that hasn’t scaled alongside factory growth, or a fuel supply problem where the coal or solid fuel belt feeding your boilers is running thin.
Adding more steam engines or nuclear reactors is the direct fix, but always check fuel supply first — a fully compressed, dedicated fuel belt to your boiler array prevents the situation from recurring. For early warning, set up a simple circuit alarm: a lamp connected to an accumulator that lights up when charge drops below a threshold. This gives you time to expand power before the whole factory starts stuttering. Pairing a strong power setup with efficient base building strategies makes a real difference as your factory scales.
🛢️ Oil Backed Up: Unclogging Your Fluids
Oil is where many mid-game factories grind to a halt. Either the tanks are overflowing with one product while others run dry, or everything stalls and refineries stop producing entirely. Both scenarios have the same underlying cause: one oil product has nowhere to go, which backs up the entire refinery chain.
Heavy oil is the usual culprit in basic oil processing setups. If you’re producing heavy oil faster than lubricant production can consume it, the refineries eventually fill up and stop. Add heavy-to-light cracking and light-to-petroleum cracking as soon as you unlock Advanced Oil Processing. Route lubricant off as a dedicated side branch before cracking kicks in so you don’t accidentally drain it.
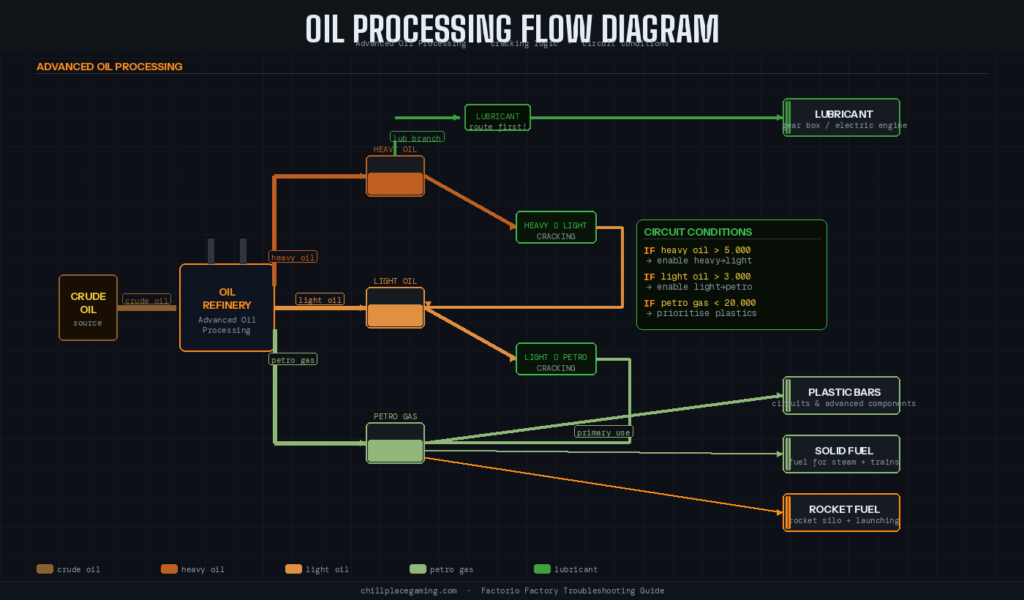
For more control, use circuit conditions to manage cracking intelligently: enable heavy-to-light cracking only when heavy oil exceeds a set threshold, and prioritize petroleum gas production for plastics when that tank runs low. A simple rule like “if heavy oil is above 5,000, enable cracking; if petroleum gas is below 20,000, prioritize plastic over solid fuel” keeps the whole system balanced. Factorio’s logistic network tools can also help you monitor fluid levels across your factory without running around manually.
🚂 Train Jams: Keeping Your Network Supplied
Trains sitting at stations with “Waiting for supply” displayed, or unloading stations running dry despite active mines — train logistics problems are common once your factory outgrows manual supply lines. The Factorio trains guide covers the full setup in detail, but the most frequent bottleneck is at the loading end.
Single-sided loading with one inserter per wagon is painfully slow. Most players underestimate just how much loading throughput their trains need until they see a queue backing up at the mining outpost. Use double-sided loading with multiple belt lanes feeding each wagon, and upgrade to stack inserters as soon as research allows. Adding a short buffer belt or chest row between the wagons and your main bus smooths out the unloading flow on the factory side.
On the production side, use the production graph to check whether ore or plates are the true bottleneck rather than the train itself. If ore production at the outpost can’t keep a single train fully loaded, adding more miners is the priority before anything else.
🔬 Science Labs Not Consuming Packs
Labs sitting idle despite science packs on the belts, or certain colours backing up while others drain — this is almost always an imbalanced production problem. Each science pack colour has its own resource costs and crafting time, which means they naturally produce at different rates if you don’t actively balance them.
Check each pack’s per-minute production in the production stats screen and compare it against your research consumption rate. The lowest-producing colour is your real bottleneck — labs can only research as fast as the slowest pack allows, so all other packs simply queue up behind it. Scale up production of the weakest link first before adding more labs.
On the belt side, use lane balancing and splitter priorities to keep all pack colours flowing evenly into the lab array. A tileable lab block design that lets you slot in additional labs without redesigning the bus pays dividends as your research needs grow. This is also where a solid grasp of automation basics for belts and assemblers really earns its keep.
🍝 Spaghetti Syndrome: When It’s Time to Rebuild
The factory technically works. Production is ticking along. But every time you try to add something new, you end up tearing apart three other things to make room. This is spaghetti syndrome — and it’s a natural stage in the Factorio learning curve rather than a failure.
The immediate fix is also the preventive measure: leave at least two to three tiles of clear space between major production blocks. It sounds wasteful in the moment, but that space becomes priceless when you need to route a new belt or pipe through without disrupting existing lines. Organising your factory into modular blocks — a smelting block, a green circuit block, a science pack block — makes each section independently expandable and replicable.
Don’t fear the rebuild. Blueprint the parts that are working well, clear the space, and re-stamp a cleaner version. The Factorio defense and base management guide has good advice on planning protected expansion space too, since biter activity often forces rebuilds at the worst possible time. Rebuilding with a clear plan is almost always faster than patching a spaghetti base indefinitely.
⚠️ Early-Game Gotchas Worth Knowing
A few quick mistakes that trip up newer players repeatedly:
- Forgetting to power things — assemblers, inserters, steam engines, and miners all need to be connected to the power grid. It sounds obvious but a single missed connection in a new build can make an entire production line look broken.
- Not leaving room for expansion — whatever space you think you need around furnace rows and lab arrays, double it. You will add more.
- Concentrating too much production in one place — producing everything at a central hub and shipping it out creates massive logistics headaches. Distributing production closer to where items are consumed is almost always more efficient at scale.
🔧 Factory Problem Quick Reference: Symptom → Cause → Fix
| Problem | Symptom | Root Cause | Fix |
|---|---|---|---|
| Belt Starvation | First assemblers run; end of line flashes “no materials” | Belt not saturated — upstream not producing enough, or too many assemblers per belt tier |
|
| Inserter Bottleneck | Belt is packed full but assemblers are slow or idle | Inserters can’t keep up with assembler speed — especially with modules or beacons active |
|
| Power Shortage | Everything slows, lamps flicker, production graph shows dips | Generators can’t meet demand — or fuel supply to boilers is starved |
|
| Oil Backup | Tanks full of one product, refineries stall, plastic/batteries stop | Heavy oil has nowhere to go, blocking the entire refinery chain |
|
| Train Jams | Trains stuck at “waiting for supply” or unload stations running dry | Mining outpost underproducing, or loading station has too few inserters / one-sided loading |
|
| Lab Idle | Labs idle while packs on belt; one colour backs up | Uneven science pack production — one colour bottlenecks all research |
|
| Spaghetti Base | Factory works but expansion requires tearing everything up | No main bus or block structure — belts and pipes cross everywhere |
|
🎮 Putting It All Together
Factorio rewards players who learn to read their factory rather than just build it. Every symptom points to a cause, and every cause has a clean fix. Check upstream production before blaming the assemblers, look at inserter speed before blaming the belt, and verify fuel supply before adding more generators. The production stats screen and power graph are your two best diagnostic tools — get comfortable with them early.
If you’re just getting started with the game, our Factorio review covers the full picture of what makes this factory builder worth your time. As your factory grows past the spaghetti stage, understanding essential materials and resource flows becomes the next big unlock for building something that can actually scale to rocket launch.
Continue Your Journey
- Factorio Automation Basics: Belts, Inserters, and Assemblers — the foundation every factory needs
- Factorio Logistic Networks Guide — automate supply across your entire base
- Factorio Trains: Getting Your Rail Network Running — set up long-distance supply lines that actually work
- Base Building Strategies — plan your factory layout for long-term growth
- Factorio Defense: Biters, Walls, and Turrets — keep your factory safe while you scale
Which factory problem do you run into most often? Drop your worst bottleneck story in the comments — or the fix that finally clicked for you.
Want more Factorio guides and strategy content delivered to your inbox? Subscribe to the Chill Place Gaming newsletter for weekly updates.
Get more strategy tips every week
Join readers who get our weekly roundup covering Cities: Skylines II, Factorio, Civ VII, and more.


